Continuous Deployment of Microservices Using ArgoCD
December 20, 2023Implementing Network & Response Rules with SUSE Neuvector
December 31, 2023
Configuring Role Based Access Control (RBAC) on HA Clusters Using ACLs
ACLs are the rules that specify which roles or users have permission to access specific resources. These rules will be used to control access to various components within the HA cluster.
When implementing ACLs in an HA cluster with RBAC, you are essentially defining rules for who can access what resources and perform specific actions.
Access Control Lists (ACLs):
Cluster administration tools, such as crm shell (crmsh) or web-based interface Hawk2, provide users with the capability to manage clusters. By default, any user in the 'haclient' group, including the root user, is granted comprehensive read/write access. However, for enhanced security and more precise control over permissions, Access Control Lists (ACLs) can be employed.
ACLs are the rules that specify which roles or users have permission to access specific resources. These rules will be used to control access to various components within the HA cluster. When implementing ACLs in an HA cluster with RBAC, you are essentially defining rules to specify who can access what resources and perform specific actions.
Role-Based Access Control (RBAC):
RBAC roles based on the responsibilities and access levels needed in your HA cluster. Roles could include administrators, operators, and viewers or monitors, each with specific permissions. RBAC is a security paradigm that restricts system access to authorized users. In RBAC, permissions are assigned to roles, and users are assigned to roles, allowing for a more organized and scalable access control system.
Requirements and Prerequisites:
Before implementing Access Control Lists (ACLs) in your cluster, it is essential to verify that certain prerequisites are met:
- Consistent User Configuration Across Nodes: Ensure you have the same users across all nodes in your cluster. This can be achieved through mechanisms like NIS, Active Directory, or manual addition of identical users to all nodes.
- Alignment with haclient Group: Confirm that all users intended for ACL modification belong to the 'haclient' group. This group association is vital for effectively managing access rights through ACLs.
- Absolute Path for crmsh Execution: Users must execute crmsh using its absolute path, which is /usr/sbin/crm.
- Path Configuration for Non-privileged Users: In cases where non-privileged users wish to run crmsh, it's imperative to extend their PATH variable to include /usr/sbin.
Enable ACLs with HAWK2:
Login to Hawk2 by pointing your browser to https://
To enable the use of access control lists, (ACL) for the cluster ACL select: Configuration -> Cluster Configuration
In the section containing the cluster-name expand the empty drop-down list and select "enable-acl".

Change the value to: Yes
Scroll down and click: Apply
You are now informed that the configuration has been successfully updated.

Setting ACL Rules:
Typically, a common practice is to consolidate Access Control Lists (ACLs) into roles and associate a particular role with users (ACL targets). The creation of ACL rules can be approached through two methods:
Setting ACLs rules via Xpath Expression: To handle ACL rules using XPath, it is essential to be familiar with the XML structure that underlies it. Retrieve the configuration of your cluster in XML format by executing the following command:
root@node1~] # crm configure show xml
Using the XPath language enables you to pinpoint nodes within this XML document. For instance, if you want to choose the root node (cib), employ the XPath expression /cib. To identify the global cluster configurations, utilize the XPath expression /cib/configuration/crm_config.
Setting ACL Rules via Abbreviations: For individuals who do not want to deal with the XML structure directly, a simpler method is available.
For example, consider the following XPath which locates all the XML nodes with the ID rsc1.
//*[@id="rsc1"]
An alternative concise syntax of abbreviation for the same purpose is:
ef:"rsc1"
Configuring ACLs:
Configure ACLs with HAWK2
The following steps illustrate the process of creating a user named "OS3usr", adding it to the "haclient" group and configuring read-only access to the cluster configuration. This involves defining a monitor role and assigning it to the user "OS3usr" to ensure the appropriate level of access.
Add New Local User (OS3usr) to all Cluster Nodes: On the first cluster node of the cluster (ha-node1), check for local user “OS3usr"
root@node1~] # cat /etc/passwd | grep -i OS3usr
The user does not exist. Add the user with the following command:
root@node1~] #  useradd -c "cluster monitoring" -u 5002 -m OS3usr –G haclient

root@node1~] #  passwd OS3usr
Set a password for the newly created user.
Repeat the previous steps with the other cluster node(ha-node2). Ensure that the user “OS3usr" has the same UID on both cluster nodes.

Create a Monitor Role Using HAWK:
Login to HAWK as the user: hacluster
Select: Configuration -> Access Control -> Roles
Complete the form using the following details:
- Role ID: monitor
- Right: Read
- XPath: /cib
- Click on "Create"
The role has been created successfully.

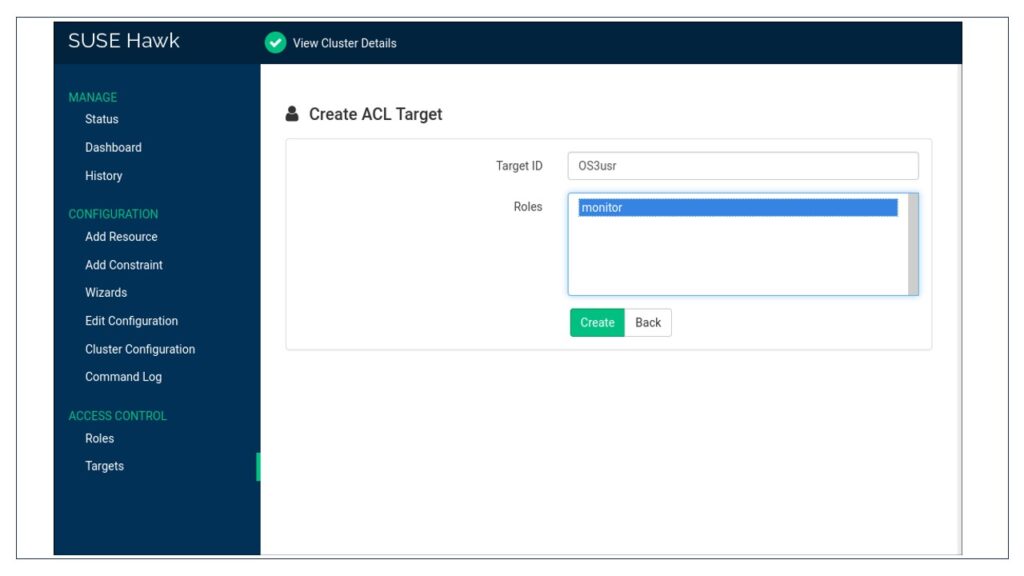
Add the "OS3usr" user to the Monitor Role:
Select: Configuration -> Access Control -> Targets
Click on "Create" and enter the following details -
- TargetID : OS3usr
- Roles : Monitor
- Click on "Create"
Test the Monitor Role:
Login to Hawk as user “OS3usr”. Attempt to stop a resource.
The attempt fails because ‘OS3usr' user is in a role with read only access to the cib.
Try to put a cluster node into maintenance mode. From the Status screen, select the Nodes link.

In the Maintenance column, click the wrench icon for a node.
In the popup dialogue box, click OK.
Maintenance mode could not be set on the cluster node because user ‘OS3usr' does not have permission to modify anything on the cluster.
Configure ACLs with the crm Shell:
The following steps demonstrate the procedure to configure a read-only access to the cluster configuration by defining a monitor role and assigning it to a user.
Login as root. Start the interactive mode of crmsh using the following command:
root@node1~] # crm configure
Define your ACL role:
Use the role command to create a new role:
crm(live)configure# role monitor read xpath:"/cib"
The above command creates a fresh role named "monitor," configures it with read permissions, and then applies it universally to all elements within the CIB using the XPath expression /cib. If needed, additional access rights and XPath arguments can be incorporated.
Assign your roles to one or multiple ACL targets (user):
crm(live)configure# acl_target OS3usr monitor
Check your changes using the following command:
crm(live)configure# show
Commit your changes:
crm(live)configure# commit

Removing a user (targets):
The procedure describes how to remove an existing user from ACL either using Hawk2 or crmsh.
Removing a target with Hawk2:
Log in to Hawk2 by pointing your bowser to https://
Select Targets from the left navigation pane.
Under the Operations column, click on the trace bin icon.
Confirm the action on the dialog box. The user has been deleted successfully.

Removing a user with crmsh:
Use the following command to remove a user from ACL:
root@node1~] # crm configure delete
Removing an existing role:
For deleting a role, keep in mind that it is essential to ensure that no users are associated with a particular role. If there are any existing references to users within the role, the role cannot be deleted. Prior to removing the role, Take the necessary steps to delete these user references before proceeding with the deletion of the role.
Removing a role with Hawk2:
Log in to Hawk2 by pointing your browser to https://
From the left navigation bar, select Roles.
Identify the role you wish to remove and click on the trash bin icon located under the "Operations" column.
Confirm the action by responding to the dialog box that appears. If an error message appears, make sure your role is “empty” and does not reference to any user.

Removing an existing role with crmsh:
Use the following command to remove an existing role:
root@node1~] # crm configure delete