Implementing Network & Response Rules with SUSE Neuvector
December 31, 2023Security Incident Response Using TheHive & Cortex – Part 2
January 6, 2024
Streamlining Windows Server Management with Ansible
In the world of IT infrastructure management, Windows servers are widely used for various applications and services. When it comes to managing these servers at scale, automation plays a crucial role in ensuring efficiency and consistency.
Ansible, a powerful automation tool, offers robust capabilities for managing Windows servers alongside Linux or Unix servers, although the approach and protocols differ. This blog post explores the need for managing Windows servers with Ansible, the challenges it presents compared to Linux or Unix servers, and the different ways to connect to Windows servers using Ansible.
Challenges in Managing Windows Servers
Managing Windows servers differs from managing Linux or Unix servers in several ways.
- Protocol Differences: One key difference is the lack of native SSH support in Windows version earlier than Windows 10 version 1809 and Windows Server 2019. SSH is commonly used for secure communication in Unix-based systems. Instead, Windows servers rely on WinRM (Windows Remote Management) for remote management, which requires additional configuration compared to SSH.
- Modules Unavailability: Another challenge is the availability of certain Windows-specific modules and features in Ansible. While Ansible provides a rich set of modules for managing Windows servers, some tasks may require PowerShell scripts or custom modules to achieve the desired automation.
- Non-POSIX Compliance: Windows servers are not POSIX-compliant, unlike Linux or Unix servers. This non-compliance can introduce additional complexity when writing automation scripts or using certain Ansible modules designed for POSIX environments.
Why Manage Windows Servers with Ansible?
Ansible is known for its simplicity and agentless architecture, making it an ideal choice for managing heterogeneous environments that include both Windows and Linux servers. By using Ansible, we can automate various tasks such as configuration management, application deployment, and orchestration across your Windows server fleet, ensuring consistency and reducing manual errors.
Read more on Ansible – My earlier Blog Posts “Managing Heterogeneous Linux Infrastructure with Ansible – Part 1 and Part 2” are good starting points.
Connecting to Windows Servers in Ansible
Ansible provides two primary methods for connecting to Windows servers: SSH and WinRM.
Connecting Windows Server with Ansible over WinRM (Windows Remote Management)
WinRM serves as a Windows-specific remote management protocol.WinRM facilitates remote communication between Windows servers over HTTP / HTTPS, utilizing the WS-Management protocol. This SOAP-based protocol enables administrators to access, edit, and update data on local and remote Windows machines securely. WinRM operates on ports 5985 (HTTP) and 5986 (HTTPS), ensuring encrypted transmission of data for enhanced security.
System Requirements
- Before diving into the WinRM setup, it's crucial to ensure that the system meets certain prerequisites:
PowerShell 3.0 or later: PowerShell serves as the backbone for WinRM functionality, providing the necessary scripting environment for remote management tasks. - .NET 4.0 or later: The .NET framework is essential for executing WinRM commands and managing remote Windows servers effectively.
Supported Windows Versions - WinRM is included in all recent Windows operating systems, spanning both desktop and server editions. Supported versions include Windows 7 SP1, Windows 8.1, Windows 10, Windows 11 for the desktop, and Windows Server 2008 SP2, Windows Server 2008 R2 SP1, Windows Server 2012, Windows Server 2012 R2, Windows Server 2016, Windows Server 2019, Windows Server 2022.
For older operating systems such as Windows 7 or Server 2008, which did not ship with .NET 4.0 or PowerShell 3.0, additional installation steps are required to enable WinRM functionality.
Setup:
Let us explore step by step procedure of WinRM configuration:
Open PowerShell on the Windows server with administrative priviledges by searching for "PowerShell" in the Start menu.
In this demonstration, we will set up WinRM (Windows Remote Management) on a Windows Server 2019 and enable the WinRM over HTTPS using a self-signed certificate and enable basic authentication to allow us to work with the local Administrator account. Before proceeding, ensure that PowerShell and .NET prerequisites are met.
Enter the following command to check the PowerShell version on the system:
PS C:UsersAdministrator> $PSVersionTable

In the above screenshot, we can see that PowerShell version 5.1 is available.
Enter the command to check the .NET version:
PS C:UsersAdministrator> reg query “HKLM:SOFTWAREMicrosoftNET Framework SetupNDPv4” /s

In the screenshot above, we can see that .NET version 4 is available. Since our system meets the requirements, we can proceed to set up WinRM on the server.
Create a self-signed certificate with the following command:
PS C:UsersAdministrator> New-SelfSignedCertificate –CertStoreLocation Cert:LocalMachineMy -DnsName "$env:computername" -FriendlyName "WinRM HTTPS Certificate" -NotAfter (Get-Date).AddYears(5)

Make a note of the certificate thumbprint.
Run the command to start the WinRM service and set the service startup type to auto-start:
PS C:UsersAdministrator> Set-Service -Name "WinRM" -StartupType Automatic –Status Running

With the certificate in place, we can set up a new WinRM listener with the following command. This command sets up a WinRM HTTPS listener on port 5986 with the self-signed certificate we generated earlier:
PS C:UsersAdministrator> New-Item –Path WSMan:LocalhostListener
- Transport HTTPS -Address * -CertificateThumbprint

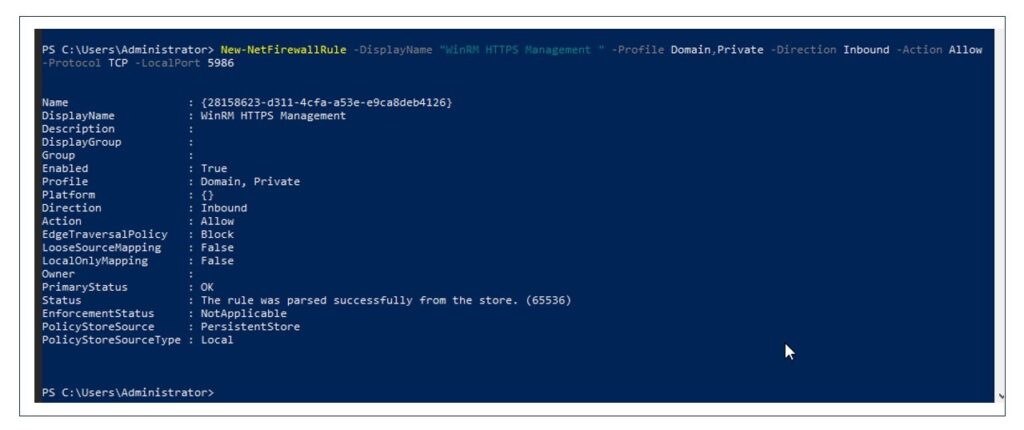
Since WinRM HTTPS listener uses port 5986, run the command to open port 5986 on the firewall:
PS C:UsersAdministrator> New-NetFirewallRule –DisplayName "WinRM HTTPS Management" -Profile Domain,Private –Direction Inbound -Action Allow –Protocol/ TCP -LocalPort 5986
Run the command to enable basic authentication:
PS C:WINDOWSsystem32> Set-Item –Path "WSMan:localhostServiceAuthBasic" -Value $true

At this stage, we have successfully set up WinRM on our Windows Server 2019, enabling secure remote management capabilities.
Ansible Configuration for Connecting Using WinRM
I have already installed and configured Ansible server on RHEL 9.3. For the Ansible installation and configuration, please refer to the blog -
Let us create the inventory to specify the Windows host we want to manage and its connection details. Below are the details of inventory file -
[win]
10.0.100.181
[win:vars]
ansible_user=administrator
ansible_password="Password"
ansible_port=5986
ansible_connection=winrm
ansible_winrm_server_cert_validation=ignore
ansible_user:
ansible_password:
ansible_port:
ansible_connection:
ansible_winrm_server_cert_validation: Server certificate validation mode (ignore or validate).
Since we are using self-signed certificate, we need to keep it ignored.

Test the Connectivity
With the WinRM and Ansible Server configured we can now test the connectivity between Ansible and Windows server with the following command.
[root@ansible-cnode]# ansible –i inventory2 –m ansible.windows.win_ping all
If the connection is successful, this will return "pong".

Connecting Windows Server with Ansible over SSH (Secure Shell): SSH, or Secure Shell, is a widely used protocol for secure remote access to systems, traditionally associated with Linux environments. However, newer versions of Windows, such as Windows 10 and Windows Server 2019 and later, come equipped with a built-in OpenSSH Server, enabling remote management using SSH.
Prerequisites:
- OpenSSH Server for Windows is supported on: Windows 10 version 1809 and later, Windows Server 2019 and later
- For older versions of Windows, we can manually install the Win32-OpenSSH Package.
Setup:
To connect to Windows servers with Ansible using SSH, it is essential to ensure that the OpenSSH Server is enabled on the Windows machine. Once enabled, we can configure Ansible to connect to Windows hosts using SSH by specifying the necessary variables in the inventory or directly in the playbook.
Using a PowerShell session with Administrator privileges, use the following command to query the available OpenSSH options:
PS C:UsersAdministrator> Get-WindowsCapability -Online | ? Name -like 'OpenSSH*'

Here we can see the OpenSSH Server is not installed.
Run the following command to install the OpenSSH Server:
PS C:UsersAdministrator> Add-WindowsCapability -Online -Name OpenSSH.Server~~~~0.0.1.0

Else, we can directly install OpenSSH server from the Windows Feature Manager.
Run the command to start the SSH service:
PS C:UsersAdministrator> Start-Service sshd
Run the following commands to ensure the SSH server service starts at boot time:
PS C:UsersAdministrator> Set-Service -Name sshd -StartupType 'Automatic'
Now add the firewall rule to allow SSH traffic to the server:
PS C:UsersAdministrator> New-NetFirewallRule -Name sshd -DisplayName 'OpenSSH Server (sshd)' -Enabled True -Direction Inbound -Protocol TCP –Action Allow -LocalPort 22

The OpenSSH server for Windows defaults to cmd for its shell. We can change the default shell from cmd to PowerShell for the OpenSSH server by running the following command:
PS C:UsersAdministrator> New-ItemProperty -Path 'HKLM:SOFTWAREOpenSSH' -Name 'DefaultShell' -Value 'C:WindowsSystem32WindowsPowerShellv1.0powershell.exe'

At this stage, we have successfully configured OpenSSH Server on Windows host.
Ansible Configuration for Connecting Using SSH
Let us create an inventory file to specify the Windows host we want to manage and its connection details.
Inventory -
[win]
10.0.100.187
[win:vars]
ansible_user=administrator
ansible_password=password
ansible_shell_type=powershell
Details -
ansible_user:
ansible_password:
ansible_shell_type:
ansible_connection:

Test the Connectivity
Populate the known_hosts file with the SSH host key of the Windows server to ensure that Ansible can establish a secure connection to the host without encountering any verification issues.
[root@ansible-cnode]# ssh-keyscan  /
>> .ssh/known_hosts

Test the connectivity between Ansible and Windows server with the following command:
[root@ansible-cnode]# ansible –i inventory –m ansible.windows.win_ping all
If the connection is successful, this will return "pong".

Advantages and Drawbacks of SSH and WinRM for Remote Server Management
Pros and Cons of Using ssh -
Pros:
- Standardized Protocol: SSH is a widely adopted protocol for secure remote access, providing a familiar and standardized method for connecting to systems.
- Cross-Platform Compatibility: SSH is the standard for remoting in Linux environments and provides compatibility with various operating systems.
Cons:
Limited Windows Integration: OpenSSH Server for Windows is supported on Windows 10 version 1809 and later, Windows Server 2019 and later. In earlier versions, it is not native to Windows and may require additional setup, making it less integrated with Windows systems.
Limited PowerShell Support: Although SSH has some support for executing PowerShell commands, it lacks the deep integration with PowerShell that WinRM offers.
Pros and Cons of Using WinRM:
Pros:
- Native to Windows: WinRM is built-in and native to Windows, requiring no additional configuration, making it easy and reliable to use.
- Ease of Use: WinRM is straightforward to set up and provides a secure transfer protocol recommended for Windows environments.
Cons:
- Performance Overhead: WinRM can introduce performance overhead due to its SOAP-based protocol and reliance on HTTP/HTTPS, potentially impacting efficiency.
- Limited Cross-Platform Compatibility: WinRM is specific to Windows environments and does not offer the same level of cross-platform compatibility as SSH.
When deciding between SSH and WinRM, consider the following:
- Use SSH when managing Windows servers that support OpenSSH and require cross-platform compatibility.
- Opt for WinRM when native Windows integration, ease of use, and support for Windows-specific features are essential.
Conclusion
In conclusion, Ansible provides a unified solution for managing both Windows and Linux servers, bridging the gap between heterogeneous environments. By leveraging Ansible's flexibility and understanding the distinctions between SSH and WinRM, organizations can effectively manage their server infrastructure, regardless of the operating system. This ensures streamlined operations and improved efficiency across the board.